Showing posts with label In the Kitchen. Show all posts

Wednesday, September 6, 2017

Cashew Hummus Recipe

Cashew Hummus* 

(the McKee family version - basic and mild)

FYI: We bought our Small Cashew Pieces from Azure Standard...

Ingredients

  • 2 cups (16 oz) raw cashew pieces toasted in oven
  • 3-4 T. toasted sesame oil
  • 2/3 cup lemon juice
  • 1 tsp Garlic Granules
  • 1 tsp Salt
  • 1 tsp cumin 
  • 1 tsp paprika
  • 1/2 tsp Chili Powder
  • 3/8 tsp cayenne 
  • all spices "to taste"

  • Black Botija Olives, pitted (optional garnish)
  • Parsley (optional garnish) 
  •  Paprika (optional garnish)

Directions

  1. Soak toasted cashews overnight. (Or at least 3 hours.)
  2. Drain and rinse cashews a few times.
  3. Place cashews and all remaining ingredients in a food processor.
  4. Puree until well blended (it will be very thick).
  5. You can add water ¼ cup at a time until desired texture...We didn't add water.
  6. Garnish with parsley, paprika, and Black Botija Olives.

    possible additions - add while blending:
    sun-dried tomatoes
    olives (10-30)
    roasted red peppers
    roasted garlic

    *original recipe came from SunFoods 

Thursday, April 20, 2017

Homemade Apple Wine

 We prefer our wine with added sparkling water.  It's just too strong to drink without it! 

  The organic apples (juice quality sweet apples from Azure Standard)  were grated and soaked...
....then Adrienne squeezed out every last bit of goodness! 

 Pouring the remaining juice through a nut milk bag.


Bottling:  The bottom of the bucket with 2 pounds of organic raisins left from the wine making.  Because we didn't bottle after 2 weeks as planned, the raisins sat in the apple wine for 5 months.  It could only have improved the final results, right?  =) 

 (click the picture to view it larger)
Recipe from H. E. Bravery's book "Home Wine-Making Without Failures"

See how the color is so similar to the color of Kombucha Tea? You really can't tell which is which- good thing we labeled it!!!


Saturday, April 2, 2016

Homemade Kettle Chips


We pulled the wrinkley and sprouting russets from the fridge. The last of 2015 harvest...we planned to make fries or chips and it finally happened. Yum!


The mandoline came in handy, but they aren't as thin as we'd like....they take a while to cook.


The oil is grassfed beef tallow and rice bran oil.


 Homegrown organic potatoes + tallow = yummy!!


 Sea salt freshly ground on top.


Wednesday, February 17, 2016

Arepas....from Columbia

We watched a Diners, Drive-ins and Dives episode that featured
 this little bread/fried cake:  Arepas from Columbia
You know us, we just had to try them ourselves.  =)
We bought the pre-cooked white cornmeal at Fiesta (grocery store).

Get the recipe here: http://allrecipes.com/recipe/238510/homemade-arepas/


~ The Arepas are ready to cook. (it was not too messy to mix up & shape)


~ Frying Arepas in rice bran oil...they take 10-12 minutes to cook.....a bit longer than the recipe calls for. We weren't sure what to look for in the finished product...gooey and cakey? How much is too much? 


~ Split and stuffed with scrambled eggs, bacon and cheese....yummy! 

(the last leftover arepa was chilled, saved for another day, chopped small & scrambled in eggs.  It was kind of like hominy.)

Arepas....from Columbia.

Wednesday, December 30, 2015

Homemade Pfeffernusse cookies


We just made these and used 2 teaspoons of cloves...they are wonderful! Of course they are even better after several days (not so strong and we worried the 2 t. was a mistake at first!). 
My mother keeps insisting that they should have black pepper. Is that really a traditional ingredient? 
I think they would be good with the bottoms dipped into dark chocolate- something like the chocolate covered, soft gingerbread cookies that Aldi's sells. Ours had a nice cross between soft and chewy texture. 
We cooked them a little longer, they were just too soft at 10 minutes. 

Wednesday, November 25, 2015

My First Slab Apple Pie

This was also my first all butter crust.  I usually make mine (here) with a food processor, but I mixed this one by hand, with a pastry blender. You can SEE the lumps of butter in the raw dough, and the crust really LOOKS flaky!  =)

We used our own recipe for the filling...we like the spice ratio we've used for years:
1 & 1/4 t.  Cinnamon
1 & 1/4 t. Nutmeg
(no allspice)

You'll find the recipe here:
http://smittenkitchen.com/blog/2013/10/apple-slab-pie/
 Notice that it calls for 1 1/2 Tablespoons of Sugar and 1 1/2 TEASPOONS of salt.  
Happy Thanksgiving!

 You can see the lumps of butter!


 Cream brushed on top and then sprinkled with Demerara sugar.

Four pounds of organic Honeycrisp apples!  Yum! 

Tuesday, November 24, 2015

Cream Biscuits


Cream Biscuits
Using rich whipping cream eliminates the need for measuring and mixing butter or shortening in these easy-mix, extra tender biscuits.  You can freeze these biscuits and cook them straight from the freezer if you like. =) 

Ingredients

1 3/4 cups all-purpose flour (we used unbleached organic from Costco)
2 1/2 teaspoons baking powder
1 teaspoon salt
About 1 1/4 cups whipping (heavy) cream

Directions

  • 1 Heat oven to 450ºF.
  • 2 In large bowl, mix flour, baking powder and salt. Stir in just enough whipping cream so dough leaves side of bowl and forms a ball. (If dough is too dry, mix in 1 to 2 teaspoons more whipping cream.)
  • 3 Place dough on lightly floured surface; gently roll in flour to coat. Knead lightly 10 times, sprinkling with flour if dough is too sticky. Roll or pat 1/2 inch thick. Cut with floured 2-inch biscuit cutter. Place about 1 inch apart on ungreased cookie sheet.
  • 4 Bake 10 to 12 minutes or until golden brown. Immediately remove from cookie sheet to wire rack. Serve hot.
For Cheddar Bay type we doubled the recipe and added:
4 teaspoons garlic powder
1 teaspoon or so of dry parsley
½ teaspoon cayenne pepper
12 oz grated cheddar cheese (sharp would be best for flavor)
We added the cheese to the dry ingredients, then added the cream.

You can freeze these biscuits and cook them straight from the freezer if you like. =)

Tuesday, October 20, 2015

Honeyed Jalapeno Rings

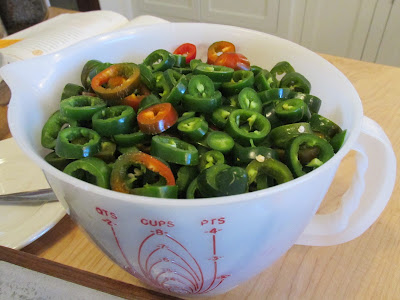
Adrienne prepped 2+ pounds of our organically grown jalapeno peppers, so we could make...
..."Honeyed Jalapeno Rings" found in  The Joy of Pickling(We really like this book.)


Some garlic slices and 3 peppercorns for each jar.
Eight half-pints!


Friday, August 21, 2015

Pesto Pasta Salad

Yum!  One 1/2 pint jar of basil pesto from the freezer....1 pound package of organic pasta from Costco, cherry tomatoes and sweet red peppers from our garden (I sauteed the peppers first), one pound + cubed mozzarella from Costco and some fresh Italian Romano and Parmesan cheese.... the pasta was too hot when I added the cheese and some of it melted into a gooey mess, but OH, WAS IT EVER GOOD!  Especially eaten right away....it lost something when chilled and eaten later, but it was still good...with more Parmesan on top, of course!   We added black olives the first time we made this and we forgot this time! 


Pesto recipe:
(if you click on the recipe, it should pop-up larger) we've made it with pine nuts as well as walnuts....well, walnuts ARE cheaper! 


Friday, July 31, 2015

EASY Healthy, Homemade Dark Chocolate

"Sinfully Delicious Salted Dark Chocolate"

This recipe was written by Amy Kelso of Backat the Ranch. Easy, tasty chocolate that is good for you!  We use Organic, Fair Trade cocoa powder from Frontier.  =)

This makes a great healthy candy, but be careful how you store it.  Coconut oil melts around 72°F!
    
Ingredients
  • 1 cup Coconut Oil  (We use the ratio of 1:2 Cocoa Butter 2 -1/4 oz & then Coconut Oil up to 7 oz total) 
  • 1 cup organic cocoa powder (3 & 1/4 oz)  (I just realized that I was accidentally using 1/2c! Well--it was good like that, but I'll have to try the whole amount next time, lol!)
  • 1/2 cup raw, local honey (5-6oz)
  • 1 tsp. natural vanilla extract
  • 2 Generous pinch of organic coconut sugar (or 1T Sucanat)
  • 2 Pinch of sea salt =)
    Optional: 1c rice cereal or granola & 1-2c chopped nuts, dried fruit, etc.
Instructions
  1. Melt coconut oil & honey in sauce pan over low heat. (We found that you have to heat it till it starts to bubble a bit- otherwise it will not harden properly.)
  2. Add cocoa powder, blend well.
  3. Stir in a pinch of coconut sugar and sea salt.
  4. Remove from heat.  (this is when you would add the optional crunchy stuff)
  5. Line a shallow baking dish with parchment paper.
  6. Pour chocolate mix onto paper lined dish.
  7. Refrigerate (or freeze) until chocolate solidifies.
  8. Cut into squares or break into bite sized pieces.
  9. Store in refrigerator. (or freezer)
Notes I collected from the original blog post:
"You can adjust the amount of honey and coconut sugar to suit your personal taste.  I like mine a little less sweet and will often cut the amount of honey in half."

"Experience has shown me (experience and some helpful comments from my readers) that this chocolate will be an oooey gooey honey-fied mess if not spread thinly enough… so word to the wise."

"If you like, you can save your sea salt ’til the final step.  Sprinkling sea salt on top of your cooling chocolate adds to the visual appeal."

Saturday, July 11, 2015

Oven Baked French Toast

We've made this recipe for years!  It's a special treat breakfast, not an everyday type of recipe....I snipped this from a Parents Magazine back in the mid-1980s.  We've never made the Praline Syrup...we prefer REAL maple syrup!  You can use an extra egg and add cinnamon and any dense bread works well. 

 Serving suggestion....if it's your birthday dinner (Adrienne's - March 2015) all the bacon you could want on the side! 

Once we made it while we were out of town visiting family and didn't have the recipe so we made it from memory and accidentally used an entire stick of butter.  We decided that was the way to go!  So in these photos that's how we made it.  Yum! 


It's easiest to soak the bread in a second 9X13 pan...yes more dishes, but it works well.  Notice the bubbling butter?!
 After turning...

 
And if there IS any leftover it's REALLY good to snack on! 

Thursday, May 21, 2015

Almond Milk

Not to be used as a milk replacement for babies!


We followed the Vita-Mix directions.

1 cup raw almonds (I sprayed them with H2O2 first)

3 cups water

Blended as per directions.

There was a lot of thick, creamy pulp left....we added it to the quiche recipe we were making, could be used for crackers or added to breads or smoothies....

In the future we will soak the almonds in salt water overnight and skin them (like we usually do) then try this recipe again.

Unless this is really scrumptious we'll probably stick to using almonds for nut butters and snacking.

 We like to salt water soak, skin and dehydrate almonds, then toast them briefly in the oven.  Yes, that's a lot of work and steps to follow, but that's the way we like them.


Next adventure....almond butter from the Vita-Mix!  Stay tuned....

Friday, February 13, 2015

the BEST pizza ever!

We found this recipe for pizza crust    (and the original recipe for the artisan bread) at Gwen's Nest blog.  Gwen goes into the benefits of long, cold fermentation and carbs and gluten.

 Our dough is much slacker, especially the longer it sits in the fridge, and wetter and we like a thinner crust that you see pictured at Gwen's Nest.   The photos of ours below are from before we worked into making it thinner and wetter.  Sorry!   Maybe one reason ours is thinner is we let the dough sit a lot longer in fridge before using, but we like it like that!   Even though it's thin, it's more soft and chewy than crispy.  Yum!!!

Our basic dough will make 2 - 15" thin crust pizzas:
 
Flour mix of:  approx.  ½ cup barley, 1 ½ cups oat, 4 cups +/- white spelt

1 T. salt

1 ½ tablespoons yeast

2 ½ cups warm water
Mix it up (it will be a wet dough - no kneading required!!!) and let it sit covered until it rises and starts to fall again.  Then put into a container and keep well covered in the fridge for at least a few days up to about 7 to 10 days or so.  It can get a dark gray liquid sitting on top of the dough like a sourdough starter does.  I just pour it off if necessary.    


Cooking instructions:  (details at links at the beginning of post)
450 degree oven - heat with baking stone.  Spread the dough on parchment paper and use a pizza peel to slide onto stone.  Bake for approx. 10 minutes.  Top the pizza and return to oven for about 10 more minutes.  Broil briefly if necessary.  
....one time we let it go so long (maybe 2 weeks?)  and it smelled very much like sourdough, even while baking, but the finished product didn't taste sour at all!  Not that we'd have minded, but our guests might have!  


We've topped it with ALL KINDS of things:  BBQ sauce, brisket (or chicken) and cheddar, sun-dried tomato pesto with mozzarella, cremini mushrooms cooked ahead in butter, olives, sauteed onion and red peppers, pepperoni or homemade Italian sausage....we've used homemade Arugula pesto, Basic pesto and regular tomato paste sauce recipe from Elana's Almond Flour cookbook.   It's our favorite dinner to have when company is coming because it's easy to have things ready ahead of time and the right guests like to help out and make the pizza!   Add a salad and dessert and there you have it!   It's so easy to heat up leftover in the toaster oven briefly and it's almost as good as fresh!   

We try to always have a batch in the fridge ready to go.  It also helps to save the space for the permanent container!  =)   One day soon we will try making some bread sticks like we've seen Julia Child make. 

 The dough is very soft/lax, and as long as your hands are wet, they won't stick too badly.

We like to top the crust with fresh Parmesan, some times we only sprinkle the edges, instead of the whole thing.

 Yum...

Wednesday, January 30, 2013

Golden Beets

 We ordered a 25 LB sack of Organic Golden Beets from Azure* this month. (We have never done that before.)  A 25 LB sack of beets is large!

 Debbie & Adrienne scrubbed almost all of them (a few are in the fridge for roasting another time), and then gave them a boiling water/cold water dip, to make them easier to peel. This process took longer than we thought it would, but it was not bad. The peeled beets looked like peaches! =)


Beets, boiling water, 1/2-1 teaspoon salt per quart jar and ONE INCH head space!  (we had beets left over, Debbie cooked & pickled them!)

Pressure can them....

 I'm not sure that Golden Beets are supposed to be canned- they lost all their color!  But we are now the proud owners of 6 quarts of beets, that will get turned into pickled beets later in the year.


*Azure is a buying club that delivers to Greenville once a month. They also deliver to Rockwall, and other places in the DFW Metroplex. (click here for info)